Showing posts with label pattern. Show all posts

Tuesday, April 3, 2012

free crochet pattern: no-sew easter/spring basket

Good morning, everyone!  Today, I have an adorable crocheted Spring/Easter basket for you to play with before Easter arrives on Sunday:


It requires no sewing  - aside from weaving in ends (and you don't even have to do that - just stuff the ends into the basket and cover with grass!)

This pattern takes very little time to work up, so they make for great favors at your dinner party.  Put an egg or two inside filled with some treats and you're ready to celebrate.

I hope you enjoy this pattern; definitely let me know if you've made anything out of it because I'd love to see your version! Visit the pattern page on Ravelry to add yours!


Materials
Size H8/5mm crochet hook
Yarn needle for weaving in ends

BASKET

Row 1: Ch 12; Sc in second chain from hook and in next 10 sts; 3 sc's in next ch; sc in next 9 sts on opposite side of chain; 2 scs in last st; join in first sc

Row 2: Ch 1; 2 scs in same st; sc in next 9 sts; 2 sc in next st; sc in next st, 2 sc in next st; sc in next 10 sts; sc in next st; join to first sc

Row 3: Ch 1; sc in same st; 2 dcs in next st; sc in next 10 sts; 2 scs in next st; sc in next 2 sts; 2 scs in next st; sc in next 11 sts; 2 scs in next st; sc in next st; join to first sc

Row 4: Ch 1; sc in same st; 2 scs in next st; sc in next 10 sts; sc in next 4 sts; 2 sc in next st; sc in next 11 sts; 2 scs in next st; sc in next 2 sts; join with a slip
stitch around (behind) first sc

Row 5: Ch 2; Bpdc around; join to top of ch 2

Rows 6-10: Ch 2; *Fpdc, dc* around; join to top of ch 2

Row 11: Ch 1, *Bpsc around*; join to first sc; fasten off


BLANKET

Change colors

Row 12: Working in front loops only of Row 11, join new color with sc;, sc around; join to first sc

Row 13: Ch 2, dc around, join to top of ch 2

Row 14: Ch 2, turn, dc around, join to top of ch 2; DO NOT TURN

Row 15: *Sk 2 sts, 5 dcs in next st, sk 2 sts, sl st in next st* around; join with sl st to first st

Push Rows 12-15 down so that they are arranged like a little blanket in the basket

HANDLE

Vote for my post on homepodge Pick up original color again

Decide where you'd like to place the handles and join oiginal color to any stitch from Row 11 in the back loop; sc in next 2 sts

Rows 16-45: Ch 1, sc aross

Join to 3 back loop sts from Row 11 on opposite side with slip stitch, fasten off

Weave in ends or stuff in basket

Monday, March 12, 2012

free crochet pattern: really easy slouchy beanie

It's here!  The long-awaited written pattern for my slouchy hat has finally arrived on my blog!

Shown in Red Heart Shimmer - Purple

 
This super simple slouch hat is perfect for beginners looking to play with some basic shaping and textures, but it's also fun for the intermediate crocheter who wants to whip up something quick and cute.

Shown in Red Heart Soft - Cherry Red

Supplies:
Medium/Worsted Weight yarn (see "Notes" below for details)
US H8/5.00mm
US G6/4.00mm
Tapestry needle (for weaving in ends)

Gauge
I will be adding my specific gauge shortly.

The gauge for the Red Heart Shimmer (shown in the purple hat photo above) is 16sc x 20r = 4in/10cm using an H8/5.00mm crochet hook. 

The gauge for Red Heart Soft (shown in the red hat photo above) is 12sc x 15r = 4in(10cm) using an I9/5.5mm hook.

The gauge for Vanna's Choice (shown in the grey hat photo below) is 12 sc + 15 rows = 4" (10 cm) on size J-10 (6 mm) hook.

Notes
Q: What if the hat is coming out too big?

A:  This could be for a couple of reasons, but first make sure that you are working to the correct gauge.  Some people naturally crochet looser than others; I'm one of the lucky few who crochets so tightly that you can barely see between the stitches (and this is why I will one day have severe arthritis/carpal tunnel).

Second, the yarns I chose for my prototypes are borderline DK weight.  If you are substituting Red Heart Super Saver, I would recommend removing one of the increase rounds and some of the work-even rounds to obtain a better fit.

Finally, the hat naturally appears very large until the last few rounds where you switch to a smaller hook and work a tighter stitch.  This change fits the hat to your head while allowing for some slouch in the back without having to think about decreases toward the end.  I love not having to count things :)


Instructions (read the pattern below or click here to download the PDF from Craftsy!):
Begin with magic loop (click here to watch a how-to video).
  • Row 1: Ch 2 (counts as first DC), 11 DCs in ring; join to top of ch 2 and pull loop tight (12 sts)
  • Row 2: Ch 2 (counts as first DC), DC in same st, *2 DCs in next st* around; join (24 sts)
  • Row 3: Ch 2 (counts as first DC), DC in next st, 2 DCs in next st, *DC in next 2 sts, 2 DCs in next st* around; join (32 sts)
  • Row 4: Ch 2 (counts as first DC), 2 DCs in next st, *DC in next 3 sts, 2 DCs in next st* around; join (40 sts)
  • Row 5: Ch 2 (counts as first DC), 2 DCs in next st, *DC in next 4 sts, 2 DCs in next st* around; join (48 sts)
  • Row 6: Ch 2 (counts as first DC), 2 DCs in next st, *DC in next 5 sts, 2 DCs in next st* around; join (56 sts)
  • Row 7: Ch 2 (counts as first DC), 2 DCs in next st, *DC in next 6 sts, 2 DCs in next st* around; join (64 sts)
  • Row 8: Ch 2 (counts as first DC), 2 DCs in next st, *DC in next 7 sts, 2 DCs in next st* around; join (72 sts)
  • Row 9: Ch 2, *DCin each st aroud*, join;
  • Rows 10-28: Repeat Row 9 for 19 rows; join
  • Row 29: .Switch to smaller hook, ch 1, *in back loop only, sc in each st around*; join
  • Rows 30-34: Repeat Row 29
Fasten off.

Shown in Vanna's Choice - Silver Grey

I hope you all enjoy this pattern!  If you have any photos, definitely post them on Ravelry because I'd love to see everything you make :)  Thanks for taking the time to drop by and check it out!

For more knit and crochet patterns, make sure to visit my Patterns page!

Monday, October 31, 2011

free halloween projects to knit or crochet during trick-or-treat!

Happy Halloween, fellow crafters!

In honor of one of my favorite holidays (the others being Thanksgiving and Christmas), I thought I'd compile this short list of fun and free Halloween projects to knit or crochet while you're waiting for all the ghouls and goblins to visit this evening:
  • You of course have to try making my mini witch hat pattern this year!  A quick and easy proejct to whip up before everyone arrives!
  • Here's a fun Halloween Skull chart pattern.  You can probably use the chart for both knitting and crocheting.
  • Look at these adorable spider decorations!  I have plenty of sparkle yarn left over from my witch hat, so maybe I'll be making a ton of these tonight during my horror movie marathon.
  • Get ready for your Halloween party with this set of hot pads and potholders.  These would have been great at our party last year with all the hot food we made - including some delicious corn pie.  Yum!
  • Cover treats of chapstick or lip gloss with these Monster Finger holders.  Take them to parties with your kids as favors or, if you feel like making them in bulk, give them out to trick-or-treaters!
  • Don't forget your pets this Halloween.  Choose from a variety of cat costumes and dog costumes to knit or crochet.
  • Why carve a pumpkin when you can knit one?  Or crochet one, too?
  • Candy corn is so gross... but looks so cute when it's made from yarn!
  • You, too, can be hipster when you wear this ironic mustache.
  • These treat bags are some of the cutest I've seen!
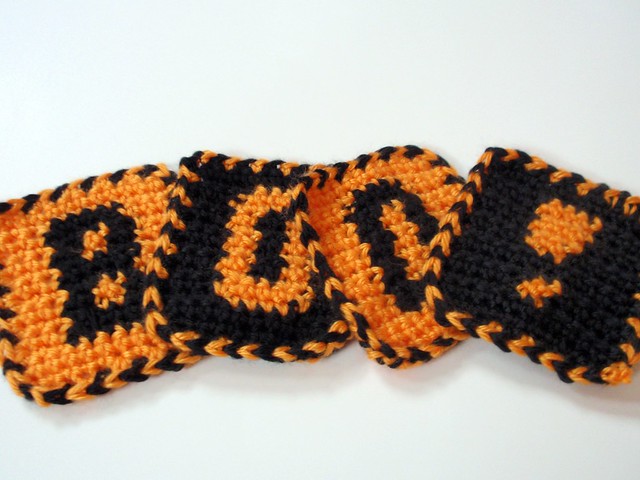
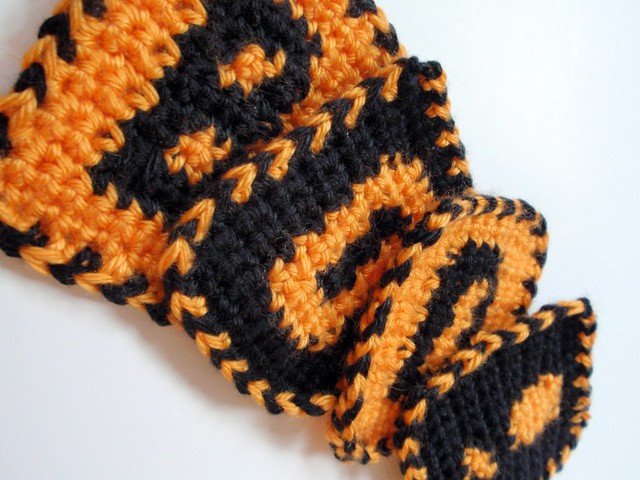
  • And last but not least, these cute little Boo Coasters.  I actually chose to make these for my Halloween project, and here's how they turned out:
P1010005

P1010007

All of the above links go to their respective ravelry pages.

Where I live, everyone comes around the Friday before Halloween. It's been an adjustment for me and just doesn't feel like the holiday when that happens. But I can guarantee that I'll be continuing my family's tradition of making wimpies and watching fun Halloween specials. Lifetime Movie Network has been having some good ones!

Enjoy all the trick-or-treaters, and let me know what you worked on this Halloween!

Monday, October 24, 2011

free halloween crochet pattern: mini witch hat

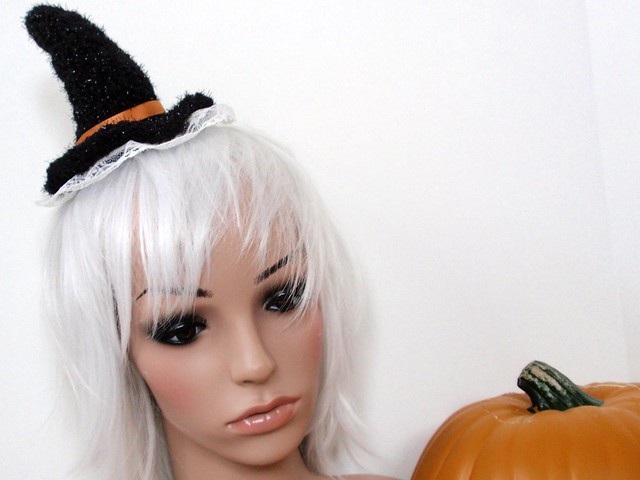
For Halloween 2011, I wanted something I could wear to work and answer our door with that didn't require a whole lot of effort.  I went all out last year with an Alice in Wonderland costume, but we just didn't have time to throw together a party this year.  Simple is always a good option when you've got a lot on your plate!

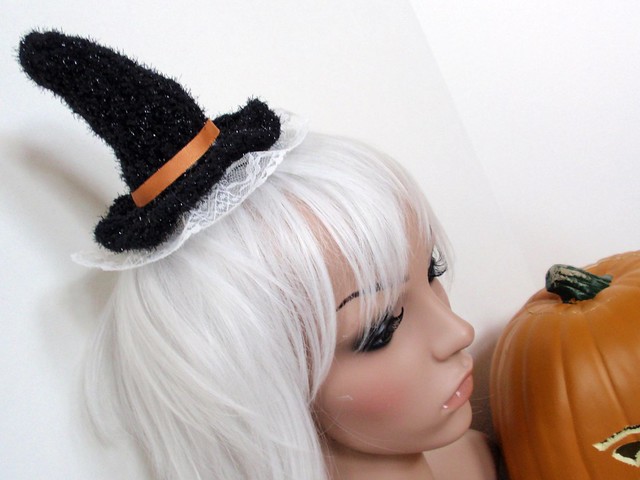
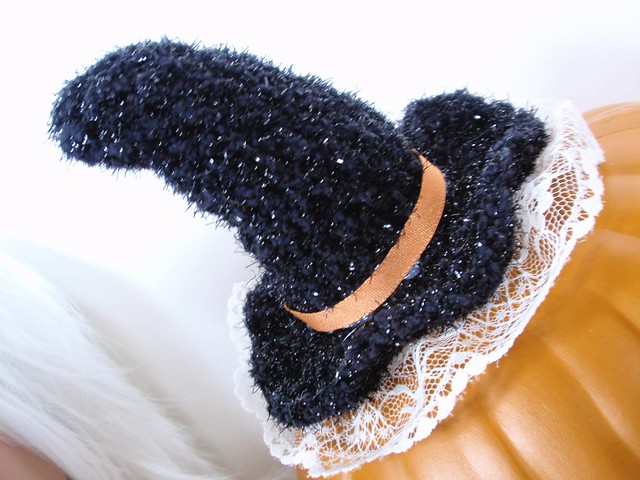
I've always loved those mini top-hats you see floating around now and then, and I thought it would be super cute to make a Halloween version.  So I came up with this quick and easy witch hat.

 P1010003

P1010004

P1010001


Supplies: 

Hook: H8/5.00mm
Yarn: DK-weight novelty

The Pattern: 
Begin by making a magic loop.
Row 1: ch1, 6 dc into magic loop. Pull loop tight and join with sl st in first dc
Row 2: ch2, dc in same st, 2 dc in each st across, join with sl st in first dc
Rows 3 & 4: dc around; join with sl st in first dc
Row 5: ch 2 (counts as first dc), dc in next 2 st, 2 dc in next st, (3 dc, 2 dc in next st)around, join with sl st in first dc
Row 6: ch 2, dc in each st around.
Row 7: ch 2, dc in next 3 st, 2 dc in next st, (4 dc, 2 dc in next st)around, join with sl st in first dc
Row 8: ch 2, dc around, join to first dc with sl st.
Row 9: ch 2, dc in next 4 st, 2 dc in next st, (5 dc, 2 dc in next st)around, join with sl st in first dc
Row 10: ch 2, dc in each st around, join with sl st in first dc
Row 11: ch 2, dc in next 5 st, 2 dc in next st (6 dc, 2 dc in next st )around, join with sl st in first dc
Row 12: ch 2, dc around, join with sl st in first dc
Row 13: ch 1, fpsc around, join with sl st to first sc
Row 14: ch 2, 2 dc in each st around, join with sl st in first dc
Row 15: ch 2, dc in next st, 2 dc in next st (1 dc, 2 dc in next st)around

Fasten off

Decorate as you'd like! I added some lace underneath and orange grosgrain ribbon. I think this hat would look really cute with some spiderwebs and maybe a spider hanging down from the point, as well!

To wear, simply secure with bobby pins wherever you'd like.

I'd love to see what everyone does with this pattern, so let me know if you use it :)

Tuesday, February 1, 2011

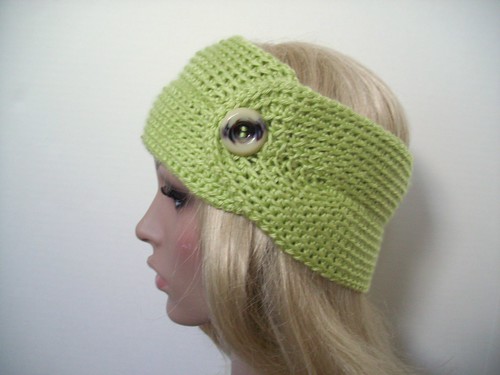
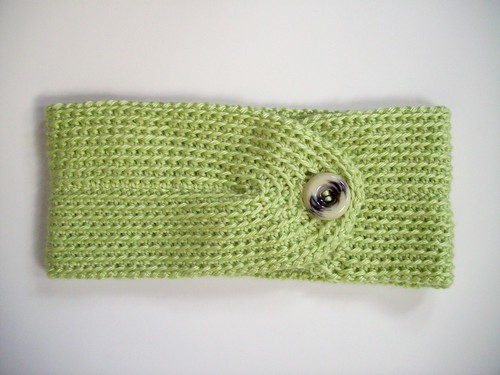
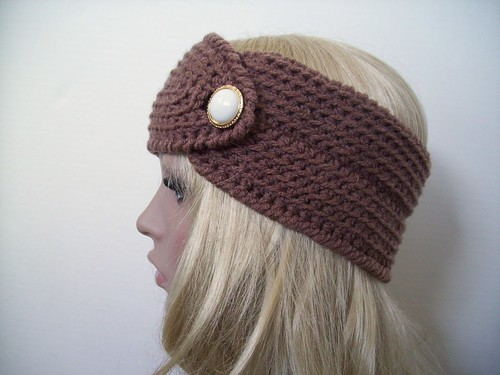
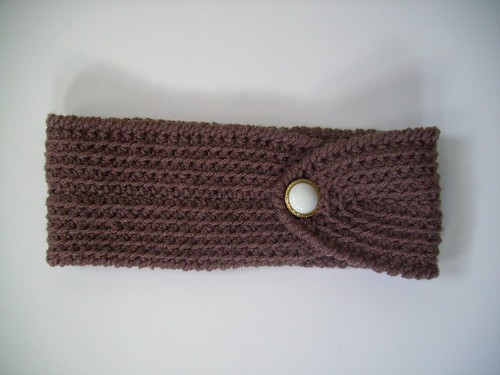
Free Crochet Pattern: Easy and Pretty Headband with Button

Yet another snowy, annoying, ice-falling-from-the-sky day brings us a fun winter pattern!  Check it out:

100_2264

100_2267

100_2249

100_2261


This pattern was created to make a headband for a friend of mine, so I thought I'd share.  If you run into any errors or need anything explained, feel free to ask and I'll try to answer them as best I can in the comments.  I wrote it down pretty quickly, so I may have missed a step or two.  Just let me know :)

Yarn used:
The light green example is Bernat Satin
The brown example is TLC Essentials

Hook:
Size G

Pattern: (Follow the instructions below or download the PDF version from Craftsy!)

Ch 74

Row 1:  Hdc in 3rd ch from hook; hdc until end of row.  3 hdc in last st; hdc across opposite side; 3 hdc in last st.  join in first hdc (NOT ch).

Row 2:  Ch 2.  In back loop only (BLO), hdc in same st as join and in each st across; 2 hdc in each of 3 corner sts; hdc across other side; 2 hdc in last 3 corner sts; join to first hdc.

Row 3:  Ch 2.  In BLO, hdc in same st as join and in each st across;  (hdc, 2 hdc)3x over the three 2hdcs in previous row; hdc across opposite side; (hdc, 2hdc)3x over the three 2hdcs in previous row; join in first hdc.

Row 4:  Ch 2.  In BLO, hdc in same st as join and in each st across; over 6 corner sts work (hdc, 2 hdc)3x;  hdc across opposite side;  over last 6 corner sts work (hdc, 2 hdc)3x; join in first hdc.

Row 5:  Ch 2.  In BLO, hdc in same st as join and in each st across; in 7 corner sts work (2hdc, hdc)3x, 2hdc in 7th st; hdc across; in last 7 corner sts work (2hdc, hdc)3x, 2 hdc in 7th st; join to first hdc.

Row 6:  Ch 2.  In BLO, hdc in same st as join and in each st across;  in 8 corner sts work (2hdc, hdc, 2hdc, ch 2, sk 2 sts, 2hdc, hdc, 2hdc); hdc across opposite side;  in last 8 corner sts work (2hdc, hdc)4x; hdc until end of round; join to first hdc.

Row 7:  Ch 2.  In BLO, hdc in same st as join and in each st across;  in 8 corner sts work (2hdc, hdc, 2hdc, 3hdc in ch, 2hdc, hdc, 2hdc); hdc across opposite side;  in next 8 corner sts work (hdc, 2hdc)4x; join in first hdc.

Row 8:  Ch 2.  In BLO, hdc around.

Row 9:  Border of your choice!  The green example is (ch1, sl st) in each st around.  The brown example is reverse sc!

Wrap around head to find where button placement should be.  Sew on button of your choice, weave in ends, and you're good to go!

I like this headband because you can use the button area to display a really cool button you've found and wear it on the side of your head as more of a decoration - OR you can wear the button in back like a regular headband for a simpler look, but decorative enough from all the hdc ridges that you look a bit fancier :)

Hope you're all staying safe in this crazy barrage of awful weather we keep getting (it's been at least twice a week for the past month that we get hit).  Tonight's supposed to bring 2" of ice, so that's fun!

Wednesday, May 27, 2009

Hugs and Kisses (XOXO) Knitting Chart

I created this chart earlier today for a hat I'm knitting and figured I'd post it here for everyone to enjoy :) Let me know if you make anything from it - I'd love to see where it goes!


Click for larger version.

PS: Pictures of the glass flower are coming soon; I'm just waiting for a sunny day so I can take some nice photos. Instead, Mother Nature has decided to play mental games with me by making it cold and dark every day this week!

Tuesday, April 21, 2009

New Pattern - Crochet Long Fitted Fingerless Gloves & Arm Warmers

So here it is: my first "for-sale" pattern! I feel like I've reached a whole new level. That said, I highly doubt it'll pay off my car or anything like that, but so far the response has been excellent (at least, with people who want to buy it). Everyone seems to love the color choices I made for the examples, which is great!

I didn't set out to write a pattern for these. I had seen similar ones and knew I could make them myself, so I sat down one weekend and came up with my own design. The pairs I had originally seen were kind of boxy, and I'm sure that's fine. I, however, have the wonderful "problem" of super tiny wrists. Every glove/arm warmer I had made in the round just never fit me right and would be crazy loose around my wrists. Well, my patterns solves that problem.

I think these gloves/arm warmers are really cute and feminine for those of us who like to show off our slender wrists. The pattern is easily adjustable (if you want it bigger, just go up a hook size, which should solve everything) and easy to embellish. One suggestion I had was to put shells at the top and bottom as an accent instead of the two different trims I unclude with the pattern - I think it's an excellent idea!

And honestly, I can't wait to see what people do with them color- and embellishment-wise.

So now... I sit and wait :)

Sunday, March 22, 2009

The Whitney Headband - (from The City, worn on Whitney Port)

Whitney Port (The City) Inspired Headband


Can't knit or crochet? Buy the actual headband in my shop!  You can purchase them pre-made, or please allow me to make one in your favorite color :)


The following pattern is based off a headband Whitney from The City wears in an episode. I, for one, have not seen the episode, but someone posted a picture of the headband for another purpose and I kind of loved it.

Supplies:
Pattern:
  • CO 84
  • Rows 1-7: (k1, p2) around;
  • Next 3": k around;
  • Last 7 Rows: (k1, p2) around
  • BO, weave in ends
Crochet Flower:
  • Pattern by Candi Jensen, available here.
    (Important - 04.21.2010: Originally, this pattern was only accessible if you logged into the Knit and Crochet Now website; however, it looks like the PDF has been permanently disabled or that there is a long-standing error in the download, and I'm not sure when it will be back up again.  If it ever reappears, I will post a notice here!  In the meantime, there are many beautiful flower patterns available on Ravelry, one of which I link below).
  • I have switched the flower used in my headbands to this lovely Irish Rose pattern, available here.  This is the flower pictured above.

Tuesday, November 25, 2008

"A Girl's Christmas" Spiral Crochet Hat Pattern


Okay, so the title says this hat is for Christmas, but we all know how versatile a pattern can be. Because of that, it really can be created in a much less tacky way than the holidays allow - but I like tacky, so here we go.

Materials:
  • Your favorite DK-weight yarn. I used Red Heart Designer Sport in colors by Candi Jensen in pink, white, and bright green. I love them so much. And the lighter yarn makes for a nicer fabric in crochet. I think I'm done with Simply Soft. Travesty, I know.

  • 4mm (G) crochet hook.

  • Large-eyed needle for weaving in ends.

Abbreviations (in order of appearance):

  • ch: chain
  • sc: single crochet
  • PM: place marker
  • inc: 2sc in st
  • BLO: back loop only
Pattern:

With white, ch3, join.
  • R1: 4sc into loop; with green: 4sc into loop; with pink: 4sc into loop, PM; DO NOT JOIN.
  • R2: inc (4x); with white: inc (4x); with green: inc (4x); DO NOT JOIN.
  • R3: (2sc, inc) 2x, 2sc; with pink: (inc, 2sc) 2x, inc, sc; with white: sc, inc, (2sc, inc) 2x; DO NOT JOIN.
  • R4: (3sc, inc) 2x, 2sc; with green: sc, inc, (3sc, in) 2x, sc; with pink: 2sc, inc, (3sc, inc) 2x; DO NOT JOIN.
  • R5: (4sc, inc) 2x, 2sc; with white: 2sc, inc, (4sc, inc) 2x, sc; with green: 3sc, inc, (4sc, inc) 2x; DO NOT JOIN.
  • R5: (5sc, inc) 2x, 2sc; with pink: 3sc, inc, (5sc, inc) 2x, sc; with white: 4sc, inc, (5sc, inc) 2x; DO NOT JOIN.
  • R6: (6sc, inc) 2x, 2sc; with green: 4sc, inc, (6sc, inc) 2x; with pink: 5sc, inc, (6sc, inc) 2x; DO NOT JOIN.
  • R7: (7sc, inc) 2x, 2sc; with white: 5sc, inc, (7sc, inc) 2x; with green: 6sc, inc, (7sc, inc) 2x; DO NOT JOIN.
  • R8: (8sc, inc) 2x, 2sc; with pink: 6sc, inc, (8sc, inc) 2x; with white: 7sc, inc, (8sc, inc) 2x; DO NOT JOIN.
  • R9: (9sc, inc) 2x, 2sc; with green: 7sc, inc, (9sc, inc) 2x; with pink: 8sc, inc, (9sc, inc) 2x; DO NOT JOIN.
  • R10-30: work even, continuing spiral, pausing at the end of your last pink row;
  • R31: with your pink color, sc around in all the other colors, joining to first pink sc in row.

DO NOT BIND OFF.

Ribbing:

  • R1: Ch 7
  • R2: Sc in 2nd st from hook, sc in next 5 sts (6 sc), sl st into next st on hat, turn.
  • R3: 6 sl sts across in BLO, ch1, turn.
  • R4: 6 sl sts across in BLO, sl st into next st on hat, turn.
  • Repeat R3-R4 around hat; join with sl sts.

BIND OFF. Weave in ends.

Word of Caution:
Make sure to keep track of your yarn, as it's easy for them to get tangled during this whole process. I wasn't paying attention for the first good half of the project and then wasted 15 minutes untangling everything - it's really not a good use of time. Spare the three seconds it takes to move the balls around when switching colors and save yourself many hassles :)

Sunday, November 23, 2008

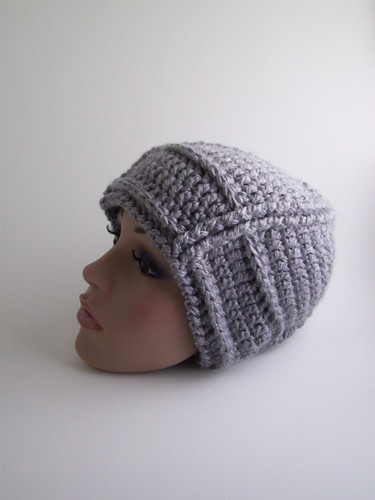
Bella Swan La Push Crochet Hat Pattern from Twilight Movie (2008)

I decided to use my amazing Google skills to see if anyone had made the crocheted hat Bella Swan wears during the Twilight movie's La Push scene (where she goes with her friends to the beach and learns about werewolves and vampires from Jacob). I can't say I was crazy about the hat, but I remembered looking at it and thinking it looked simple enough to make and still pretty cool (not all neat things need to be difficult).


Bella's Twilight La Push Hat Photo and Pattern


Materials:
  • 1 skein Caron Simply Soft in grey (or whatever color you prefer, but Bella's is grey)
  • 5.5mm crochet hook
  • 1 large-eyed needle (for weaving in ends)

Some pre-pattern info:I imagine you can use most worsted-weights single-stranded and accomplish the same feat; however, most of us know that Caron is not your typical worsted weight, so I double-stranded the whole thing. It's not a bad result at all. Just play around with the yarn until you're able to get the proper size to fit over your head :)

To make it look more like Bella's hat, you would use a thinner yarn and more rows in between the BPdc's, adding more length as you go. I kind of like the chunkier look.

As always, please let me know if you find any errors in my pattern :)

Special Stitches:
FPtr: Yarn over twice, insert hook around the post (from the front side of your work) of the stitch indicated; yo and draw up a lp (4 lps on hk); yo and draw through two lps (3 lps on hk); yo and draw through two lps (2 lps on hk); yo and draw through two lps (1 lp on hk)
BPdc: Yarn over, insert hook from the back side of the work right to left around the post of the indicated stitch on a previous row; yo and pull up a loop (3 lps on hk); yo and draw through two lps (2 lps on hk); yo and draw through two lps (1 lp on hk)

Pattern:
Ch 3, join
  • R1: Ch3 (counts as 1st dc), 11dc's into loop, join. (12dc)
  • R2: Ch3, dc in same st (inc made), 2FPtr, [2dc in next st, 2FPtr] 3x, join.
  • R3: Ch3, dc in same st (inc made), dc in next st, 2FPtr, [2dc in next st, dc, 2FPtr] 3x, join.
  • R4: Ch3, dc in same st (inc made), dc in next 2 sts, 2FPtr, [2dc in next st, 2dc, 2FPtr] 3x, join.
  • R5: Ch3, dc in same st (inc made), dc in next 2 sts, 2dc in next st, 2FPtr, [2dc in next st, 2dc, 2dc in next st, 2FPtr] 3x, join.
  • R6: Ch3, dc in same st (inc made), dc in next 4 sts, 2dc in next st, 2FPtr, [2dc in next st, 4dc, 2dc in next st, 2FPtr] 3x, join.
  • R7: Ch3, dc in same st (inc made), dc in next 6 sts, 2dc in next st, 2FPtr, [2dc in next st, 6dc, 2dc in next st, 2FPtr] 3x, join.
  • R8: Ch3, dc in same st (inc made), dc in next 8 sts, 2dc in next st, 2FPtr, [2dc in next st, 8dc, 2dc in next st, 2FPtr] 3x, join.
  • R9-R12: Ch3, 11dc, 2FPtr, [12dc, 2FPtr] 3x (work even), join.
  • R13: Ch3, 11BPdc, 2FPtr, [12BPdc, 2FPtr] 3x (work even), join.
  • R14-16: work same as R9
  • R17: work same as R13
  • R18: [Ch1, sl st] around, join.
Bind Off.
Related Posts Plugin for WordPress, Blogger...